17. Appliance uprade to Version 3
The Appliance version 3.x is based on Debian Buster. There is no direct update path for the operating system of the Appliance earlier versions to 2.3, this requires a new installation. The Appliance’s backup recovery function is used to migrate all necessary data (including configuration and token management) from the old computer to the new one. This guide describes all Steps required for a smooth transition to the current version of the Appliance.
steps to take:
Backup of your productive Appliances
Installation of Appliance version 3
Restore the old configuration to the new Appliance
Notes on redundant setup
Verify whether the new Appliance is working properly
17.1. Backup old Appliance
This should be done in a time you expect not too many changes regarding tokens etc. Access the management web UI of your productive Appliance:
https://<IP_OF_APPLIANCE>:8443.
Go to “System” -> “Backup”, create a full backup and save it to your machine.
Note
Please also refer to chapters Manual Backup and if you run in a redundant setup Restoring the redundancy.
Tip
Keep the old machine as fallback in case something goes wrong during the migration procedure.
Warning
Please consider if you have changed anything on your machine in unsupported mode (e.g. Apache configuration) and backup these configuration settings in order to apply them after the restore procedure manually.
17.2. Create and install a new Appliance
Create a virtual server (or use a bare metal one if you like) with at least:
2 GB of main memory,
12 GB of hard drive space and
a network card, capable of accessing the internet. (VM-Ware: e1000).
VM guest tools for VMware and KVM are installed automatically, others can be installed later.
Note
Please note: The installation is done with the Offline Installer, it does not need direct access to the Internet. An offline installation method is available, as described in Offline Installation is described. The installer is part (download link) of the license key delivery. It can be requested/downloaded again at any time.
Integrate the LinOTP Virtual ISO image as a CD drive in your virtualization and start from there.
After a short boot process the installation menu appears. Choose your variant of the keyboard. If the network settings have to be made manually, a corresponding prompt appears. Otherwise the installation will continue until reboot.

No DHCP - Network Configuration:

Manual Network Configuration:
Fill in the required information and then confirm it.


The remaining installation process does not require any additional information from the user.
The system is restarted after the conclusion of the installation. Please ensure that the following boot process does NOT take place from the ISO image, but instead from the hard drive of the virtual server. You can access LinOTP from the web interface as soon as the login prompt appears in the console of the virtual machine.
17.3. Basic configuration of the new LinOTP Appliance
Launch your browser and enter @https://<IP_address_of_your_LinOTP>:8443 in the address line in order to access the web-based configuration interface of the Appliance.
- TIP:
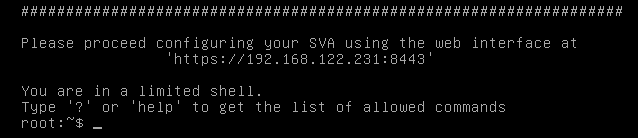
If your Appliance received its IP address via DHCP you can figure out the address by directly log in to the console of your virtual system using username “root” and password “eBai6Lait9”. The IP address will be displayed right after the login:
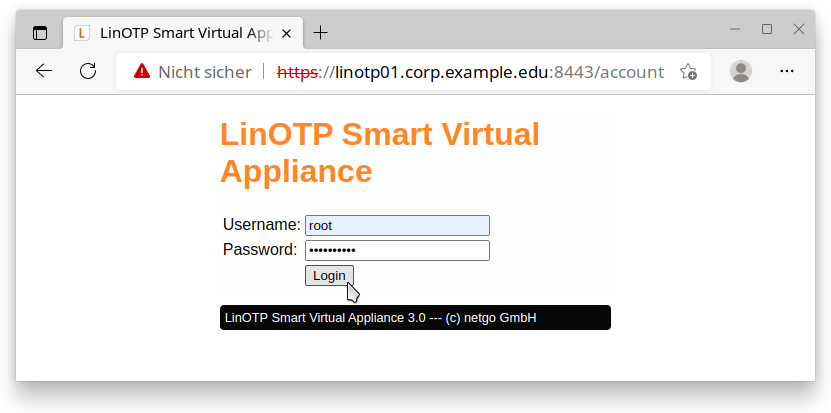
When opening the configuration interface of the Appliance, a window will appear with a certificate warning that varies based on the browser used. However, there is no risk in this case. The warning notification appears because LinOTP Smart Virtual Appliance presents the browser with a self-signed certificate when opened. Therefore, please ignore the certificate warning and confirm the access to the IP address requested (your configuration interface of the Appliance).
You will be asked for a user name and password on the login screen that then opens. Enter “root” here as the user name and the initial root password “eBai6Lait9”
After the successful login you should see the following welcome screen:
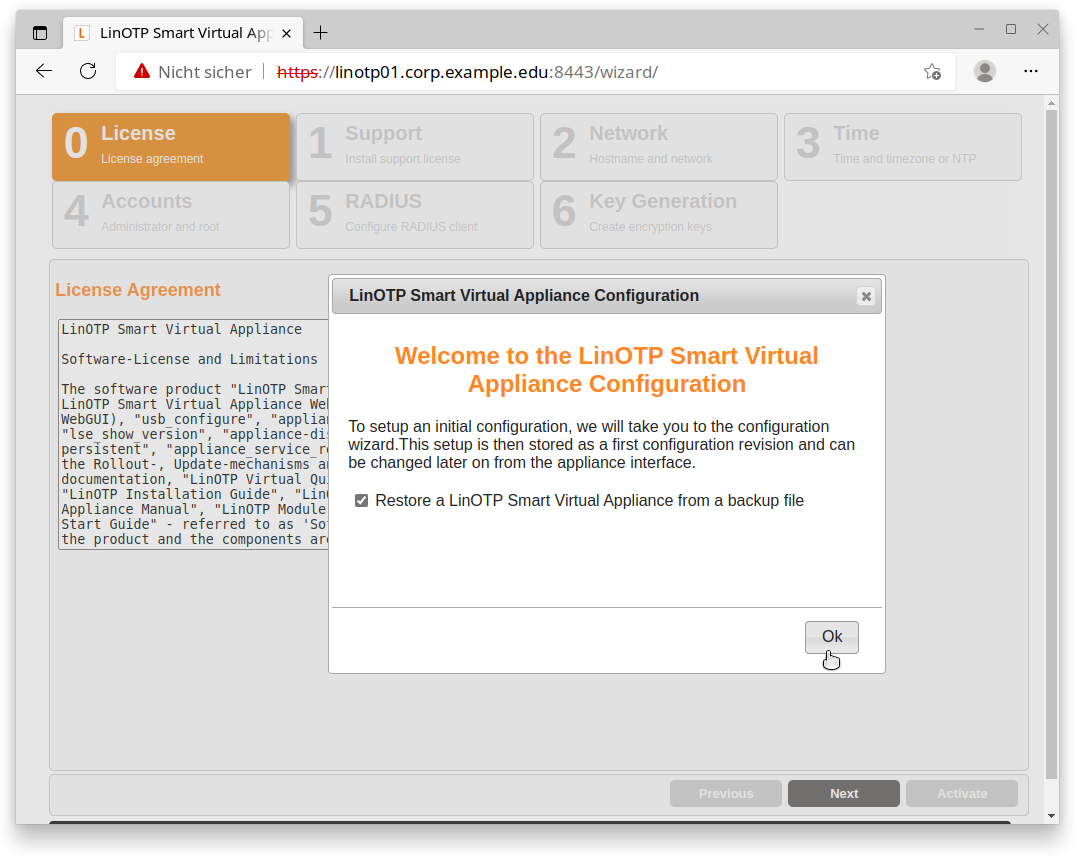
This is the setup wizard. It can be used to configure your new LinOTP Appliance and to restore your backup.
17.4. Restore LinOTP Appliance Configuration
Right after the login you will be asked whether you want to restore a backup or to setup the new machine manually. Please check the box “Restore an LinOTP Smart Virtual Appliance from a backup file” and continue. You will see the head of the website changing to contain fewer configuration items.
Warning
The full backup of a SVA version 2.x can only be restored at this point. If you decide to set up the new SVA without restoring the backup in the wizard it will be still possible to import the database and the encryption key via the Appliance dashboard (@https://<LINOTP>:8443 –> System –> Restore, see Restore Settings and Data for details). A full restore is not possible anymore and will potentially damage the system.
0. License Agreement
Please read the license agreement carefully. To advance to the next step, check the box following “I accept the license agreement” and click on “Next”. By doing so, you declare your acceptance of the license agreement.
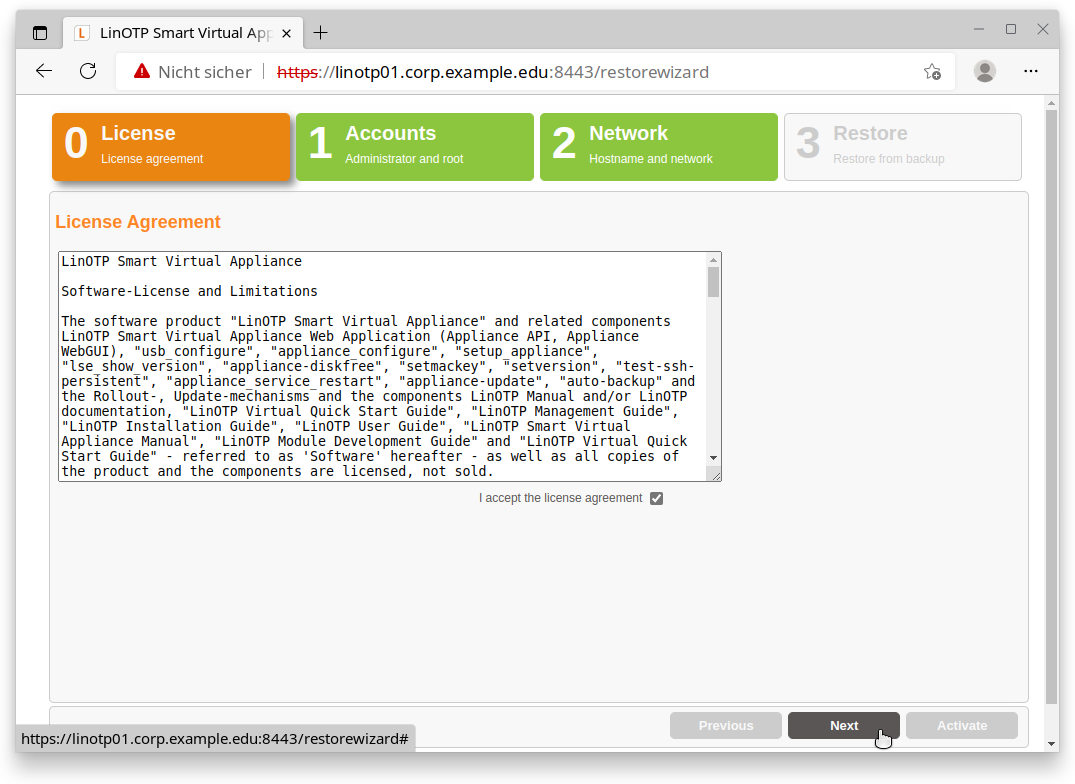
1. Accounts
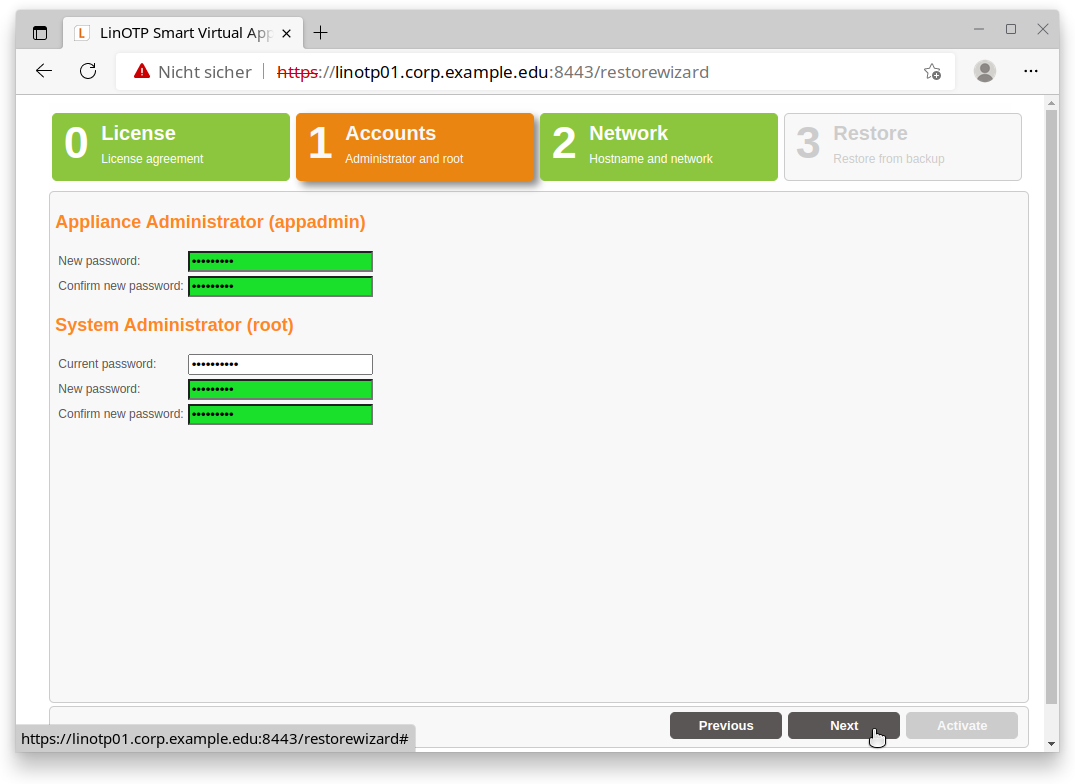
The LinOTP Appliance generally recognizes three different roles:
LinOTP Administrators – the LinOTP Admins are responsible for token and user management (@https://<IP_OF_LINOTP/manage>). They do not have any rights on the level of the Appliance operating system or on the network level - these accounts will be restored from the backup file.
Root Administrator – the Root Admin has the most rights. This role can do everything except manage the LinOTP.
Appliance Administrator – the Appliance Admin may only change the Appliance functions and provide access rights. He may change passwords (including root’s password if he can provide the old root password)
Now provide the passwords for the last two roles. The “Old root password” requested for the Root Admin role is the initial root password “eBai6Lait9”.
Note regarding password complexity
For security reasons, be certain to select sufficiently complex passwords when changing the passwords. Passwords are deemed to be sufficiently complex by today’s standards when they meet the following criteria:
Password length of at least 10 characters
Combination of uppercase and lowercase letters, number and special characters
Once you have entered all of the passwords, go ahead to the next step by clicking the “Next” button. Please note that the input mask depicted can only be exited when all fields have been completed and the newly entered passwords are highlighted in green. Scrolling backwards using the “Previous” button is also not possible until the fields have been fully completed.
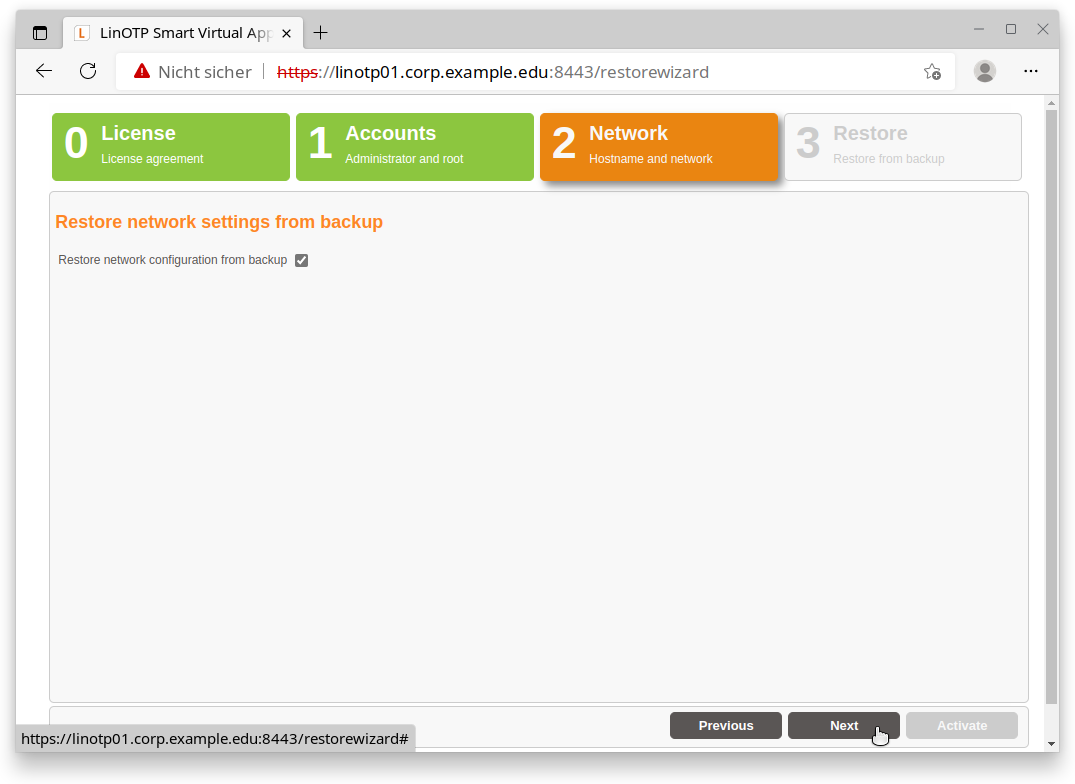
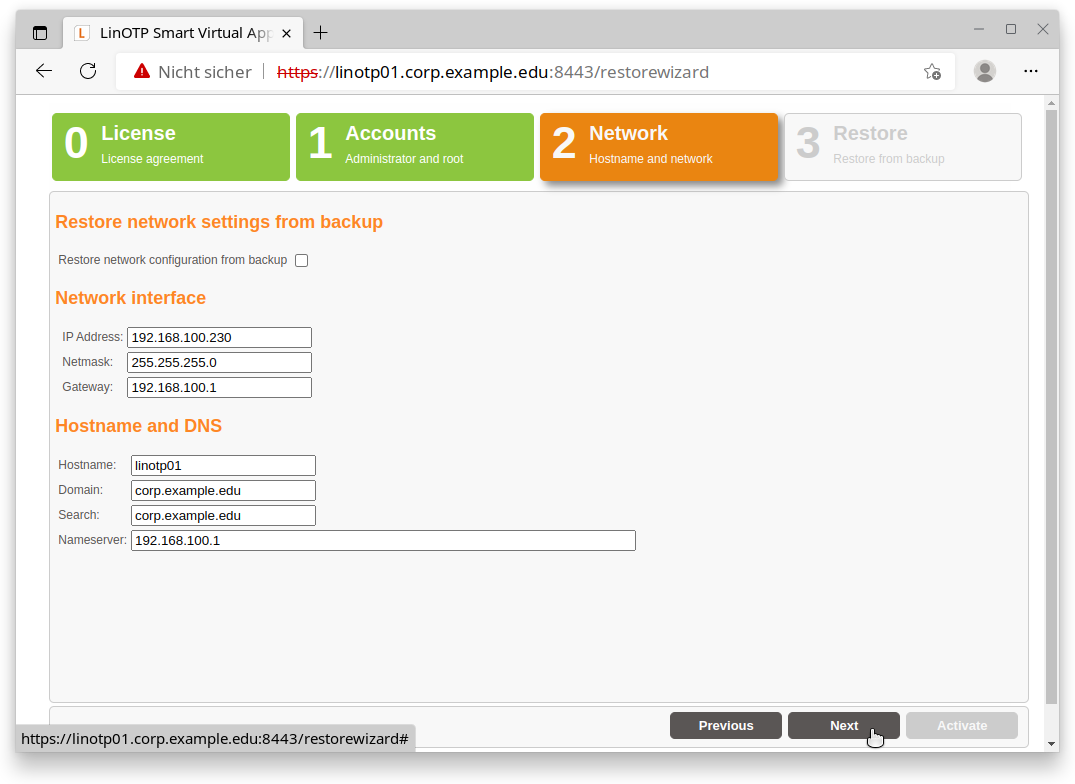
2. Network
Here you see the current network configuration of your new Appliance. You have to decide, whether you would like to keep this configuration or to restore the network settings from backup. If you want the latter, please choose “Restore network configuration from backup”.
Warning
Please be aware: if your old Appliance is running in the same network environment as the new machine you should not restore the IP from the backup - because both machines would run with the same IP causing problems. So either shutdown the old machine or configure a different network setting for the new one. You can change this configuration at any time later in the management web UI.
If you prefer a manual configuration of the network then fill in the needed information and proceed with the next page:
3. Restore
As last step choose the backup file made from the original machine:
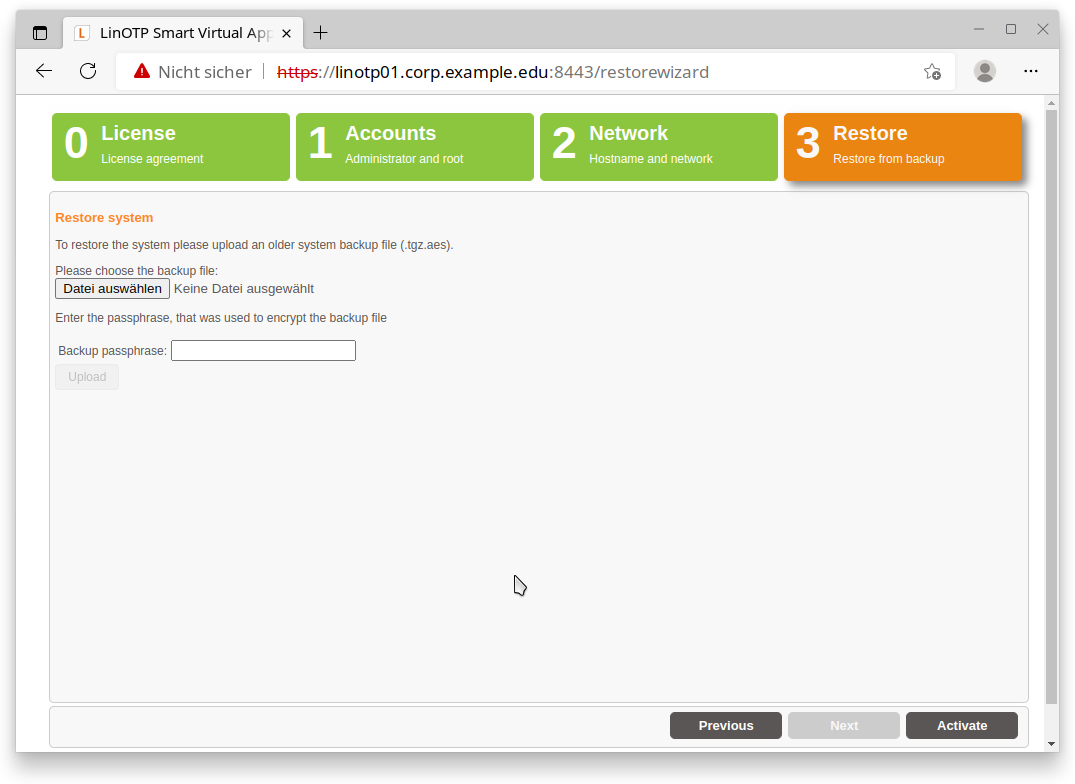
Enter the passphrase used for encrypting the file:
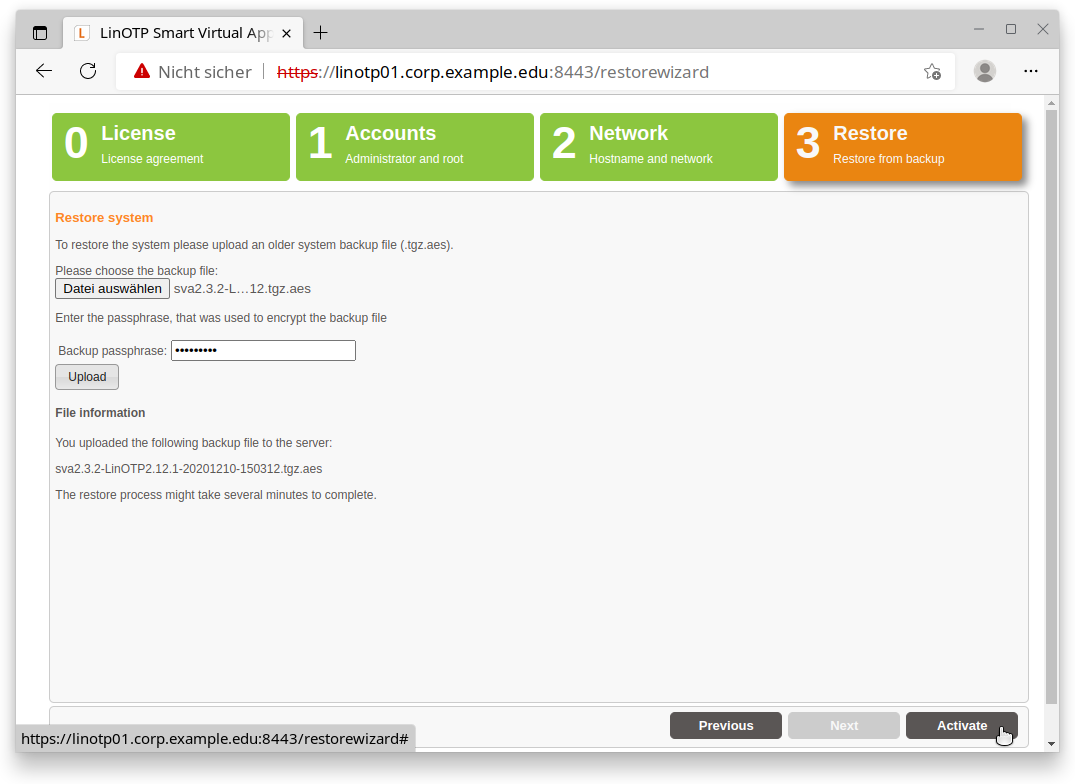
Activate the restore procedure:
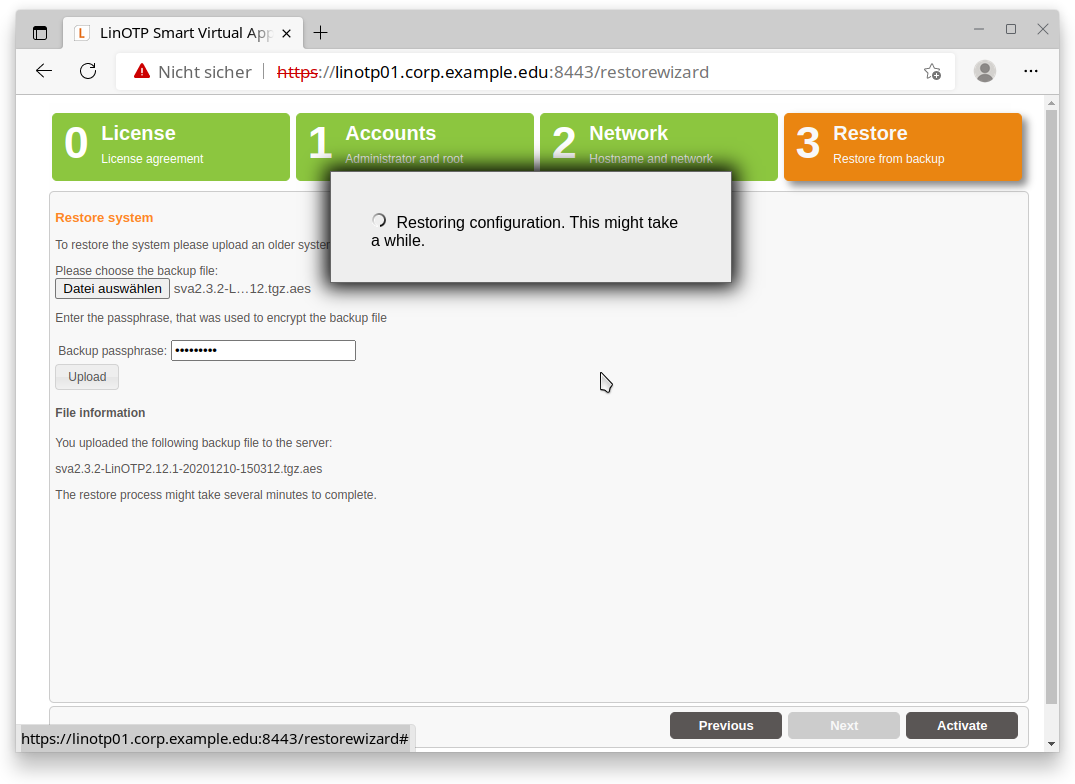
And wait until it is finished…
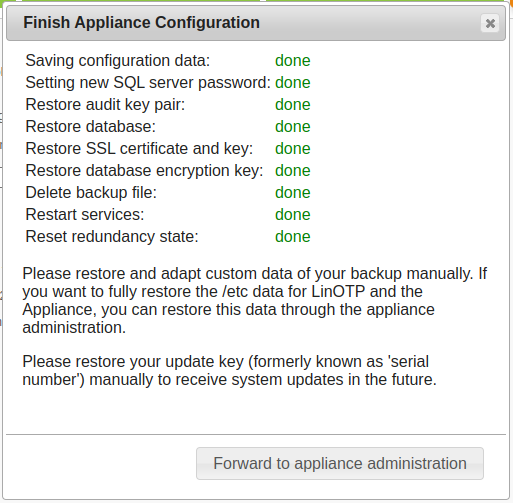
After the procedure is finished, a popup appears. Confirm and you should be forwarded to the management web UI of the new machine. The restore is complete and all configuration settings regarding the Appliance itself and LinOTP (i.e. tokens, UserIdresolver, policies and so on) should be the same as in the original machine.
Note
The old logfiles of Apache are not restored. So if you have any need for them the most convenient way is to perform a backup directly from the original machine.
17.5. Restoring the redundancy
Restore both nodes as described above.
Note
It is recommended to deactivate redundancy before performing the backup of the old Appliances. In this case it will be only necessary to reinitialize the replication from the machine with the more recent restored database after the setup of the new Appliances is finished (step 2).
If the redundancy was included in the backup we are going to deactivate the redundancy first and then reinitiate the synchronization from node 1 to node 2.
Log in to the terminals of node 1 and node 2 and execute on both machines (use the root credentials set during the recovery procedure):
appliance_configure.py -c reset_redundancy
Log in to node 1 and execute:
appliance_configure.py -c setup_redundancy -p <IP_OF_NODE_2>
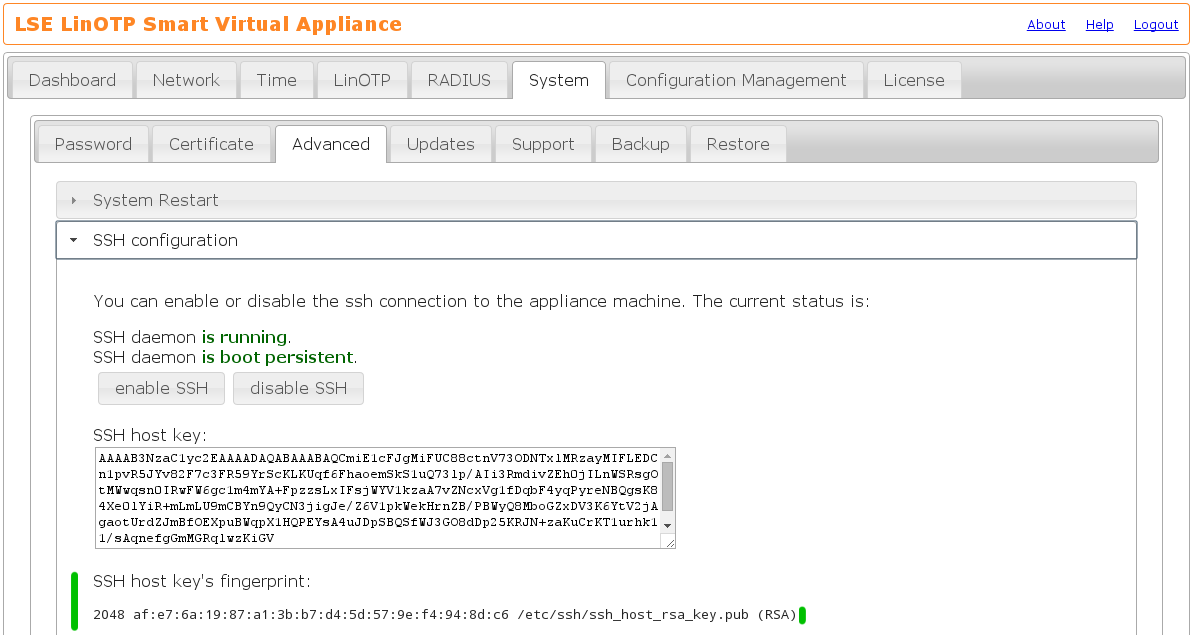
For security reasons you have to make sure to connect to the right machine by comparing the SSH host key displayed during the setup procedure to the one of the second node. You will find the SSH host key in the Appliance management webinterface https://IP_OF_NODE_2:8443 in System -> Advanced -> SSH configuration:
The complete redundancy procedure looks like:
root@linotpappliance:~# appliance_configure.py -c setup_redundancy -p 192.168.122.161
Welcome to the redundancy wizard.
Please make sure that timer_entropyd is running.
Do you want to setup IPSec-based encryption between the machines? [y/n] "y"
You will have to verify the partner hostkey fingerprint and give the partner's
root password in order to start the setup process.
Since the SSH command only waits for input for a certain time, please make
sure that:
 * the partner hostkey fingerprint
 * the partner root password
are close at hand.
You can find the partner hostkey fingerprint at https://192.168.122.161:8443/
at System-Advanced-Redundancy.
Please hit RETURN to continue:
The authenticity of host '192.168.122.161 (192.168.122.161)' can't be
established.
RSA key fingerprint is af:e7:6a:19:87:a1:3b:b7:d4:5d:57:9e:f4:94:8d:c6.
Are you sure you want to continue connecting (yes/no)? "yes"
root@192.168.122.161's password:
bind: Cannot assign requested address #not an error
Success!
Terminating the SSH tunnel ... (this is expected!)
Now both nodes should now work in sync - please proceed with the test procedures described below.
Note
If you had any special configuration settings in the old Appliance you have to apply them carefully by hand - please be aware of changes between Debian Squeeze and Debian Jessie (e.g. you have to consider the new configuration syntax of Apache 2.4).
17.6. Check the new LinOTP Appliance
Note
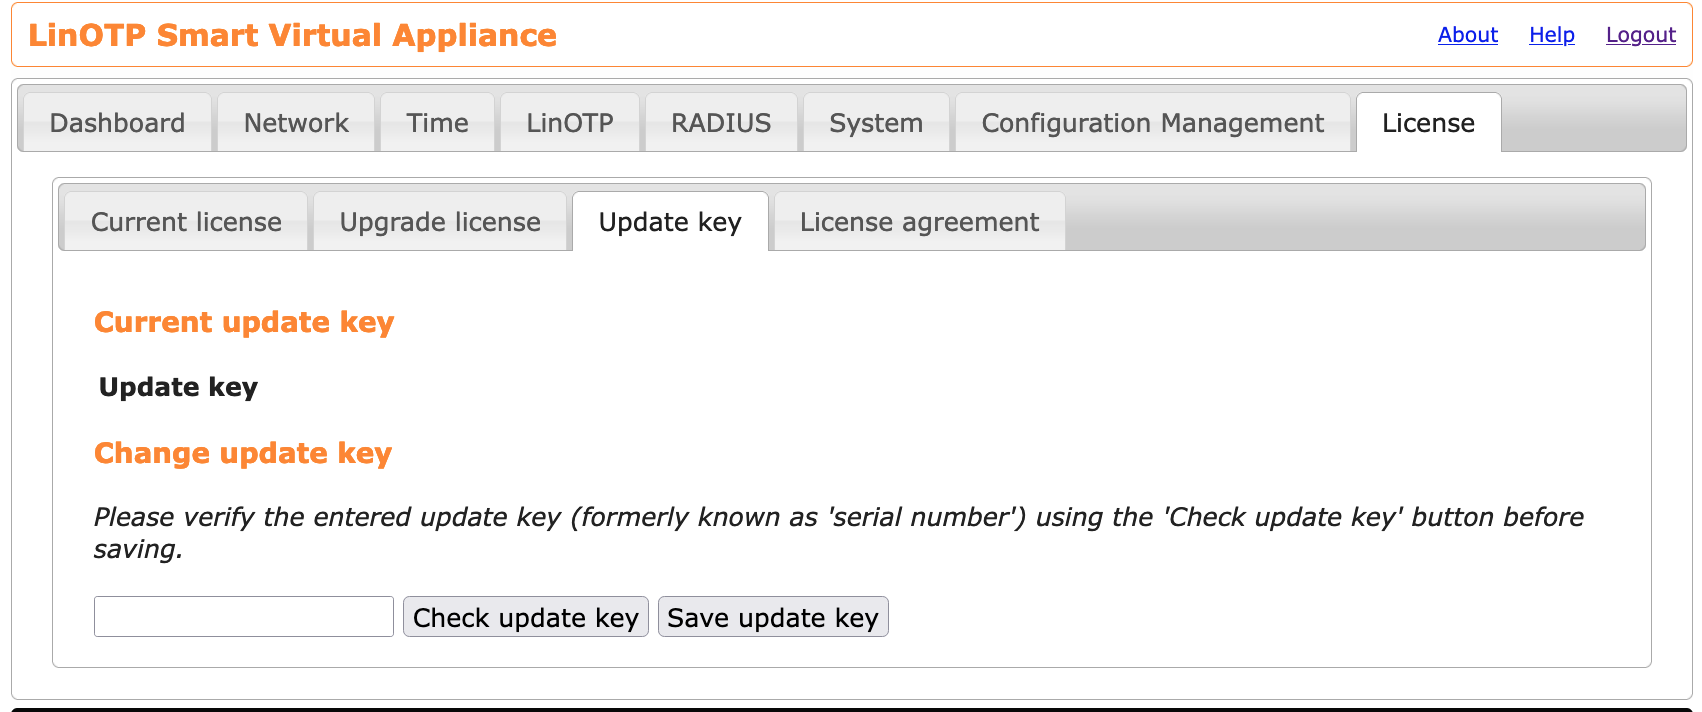
If you have not yet entered an update key under license, do so first.
Review the success of the restore procedure. Log in to the Smart Virtual Appliance management webinterface (consider that the IP might have been changed due to the recovery):
https://IP_OF_YOUR_LINOTP:8443
Note
In case you can not connect to the webinterface: If something went wrong and you are unable to reach the Appliance e.g. because of a wrong IP you can log into the console of your virtual system using username “root” and the appropriate password as it was set in the backup. Enter the command unsupported. Now you have full administrational access and you can fix the wrong IP with ifconfig eth0 IP_YOU_WANT. Now you should be able to connect to the webinterface to check and fix configuration there.
Check configuration:
Have a look at least at:
network/routing/hostname/DNS settings
correct time configuration
If used: the RADIUS setup - are all client configurations correctly restored?
Be aware:
Not all configuration details are backuped and restored by LinOTP Appliance. So if applicable please review after the recovery procedure special settings you remember like:
deactivated/activated services, e.g. haveged or sshd
SSH server- and clientkeys & SSH server configuration itself
Finally connect to the token- and user management webinterface:
https://IP_OF_YOUR_LINOTP/manage
Are the UserIdResolver working correctly and are the users displayed in User View sorted by their realms?
Do you see tokens in Token View and are they assigned to users?
Are the policies restored?
Note
Node recovery:
Rollout an example token on one of the nodes and assign it to a test user. Switch to the other machine and check if you can see the token and the assignment there as well.
Test if Appliance is working properly:
If you possess a test account, please try to authenticate by accessing
@https://<IP_OF_YOUR_LINOTP>/validate?user=TESTUSER&pass=PINOTP
Where the possible parameters are:
- user
the name of the user that should be authenticated
- pass
in most cases a combination of the PIN and the OTP of the user
- realm (optional)
the realm of the user; must be specified, if the user is not member of the default realm
In case of success you should see something like this:

If RADIUS is used you should additionally check whether a user can authenticate via this infrastructure as well.
Note
If your original Appliance was used during the migration procedure, the data of the new machine might be a bit older (they originate from a backup some time ago). This may imply that e.g. the HMAC counter of the tokens might be out of sync with the data of the restored database. So you probably have to ask your users to go to the Selfservice Portal and resynchronize their tokens. You can provide the necessary ability for your users by configuring the selfservice policy resync as described in http://www.linotp.org/doc/latest/part-management/policy/selfservice.html.