2. Quick Start Guide
2.1. Introduction
Thank you for purchasing a LinOTP Smart Virtual Appliance for strong user authentication
This Quick Start Guide is divided into two parts and an appendix:
Part 1 describes the access and setup of the Appliance via the web-based configuration tool.
Part 2 explains the installation of the license file as well as the rollout of the tokens.
You will find practical tips and legal notes in the appendix.
2.1.1. Licensing
LinOTP Smart Virtual Appliance can be acquired with a existing LinOTP Enterprise Subscription and Support License. Subscription and Support are licensed for the number of active token managed in LinOTP. You can find instructions on installing the license file during the configuration wizard in part 2 of this Quick Start Guide. Please have a look at LinOTP Smart Virtual Appliance License.
2.1.2. Documentation, Support & Notes
A complete introduction can be found in the LinOTP Manual, which you can download from the Appliance menu using the help function.
You will find more information for technical support as well as practical tips at: https://www.linotp.de/support.html
2.2. Part 1: Setup the LinOTP Smart Virtual Appliance
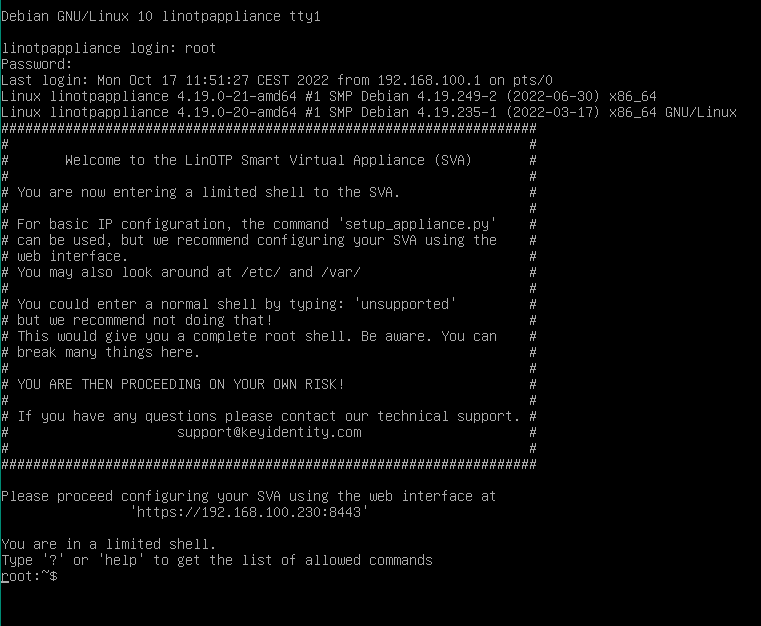
For accessing the web configuration interface of the Appliance you have to know the IP address. If you automatically receive your IP address, you can allow it to be displayed directly in the console of LinOTP Smart Virtual Appliance. To do so, log in with the user name: “root” and the password “eBai6Lait9” directly in the console. The IP address will be displayed ( version 2.0) or enter the command “ifconfig” - the address will appear in the second line below eth0 (inet addr:)
Note
We recommend conducting all additional configuration of the web interface after installation!
When opening the configuration interface of the appliance https://[IP address of your LinOTP]:8443, a window will appear with a certificate warning that varies based on the browser used. In general, you should take this kind of certificate warning seriously when visiting websites, as these provide information regarding possible security risks and thus associated risks for the visitors of a website. In the case of LinOTP Appliance, however, there is no risk. The warning notification appears because LinOTP Smart Virtual Appliance presents the browser with a self-signed certificate when opened. Therefore, please ignore the certificate warning and confirm the access to the IP address requested (your configuration interface of the appliance). If your browser allows, you can add the IP address of your LinOTP Smart Virtual Appliance to the list of trusted sites.
As an alternative to the certificate delivered, you can also add your own certificate at a later time using the Appliance Management. To do so, please refer to the LinOTP Manual (Chapter IV “LinOTP Appliance Manual”, Section 8 “Change the Server SSL Certificate”)
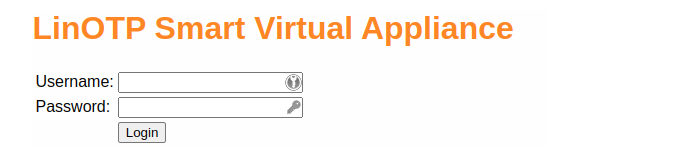
You will be asked for a user name and password on the login screen that then opens. Enter “root” here as the user name and the initial root password “eBai6Lait9”. For security reasons, you should change this password in the fourth-step of configuration wizard (Configuration – Quick Start, 4. User Roles and Passwords) described in the following.
If LinOTP is intended to be operated behind a firewall, for example in a DMZ, please be sure to take the correct configuration of the firewall rules into account. You will find the corresponding section in the LinOTP Manual, (Chapter IV “LinOTP Appliance Manual”, Section 14 “Network Integration”)
2.3. Configuration - Quick Start
If you have not already done so, open your browser and access the Configuration interface of the LinOTP Appliance as described on page 9 under number 11. You can correspondingly ignore the certificate warning and log on with the root password.
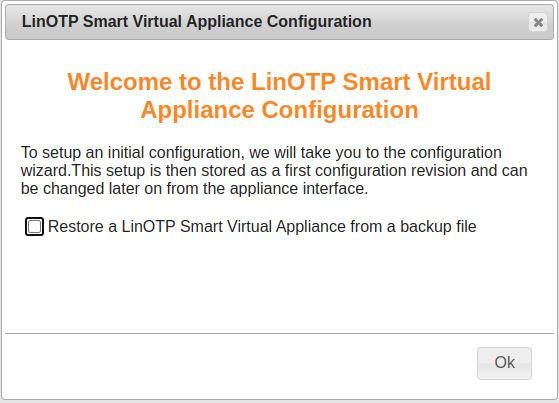
Right after the login [Appliance version 2.0 upward] you will be asked whether you want to restore a backup or to setup the new machine manually.
Please check the box “Restore a LinOTP Smart Virtual Appliance from a backup file” if you would like to restore the machine from a backup file. You will see the head of the website changing to contain fewer configuration items. Continue otherwise with the normal setup procedure as described below.
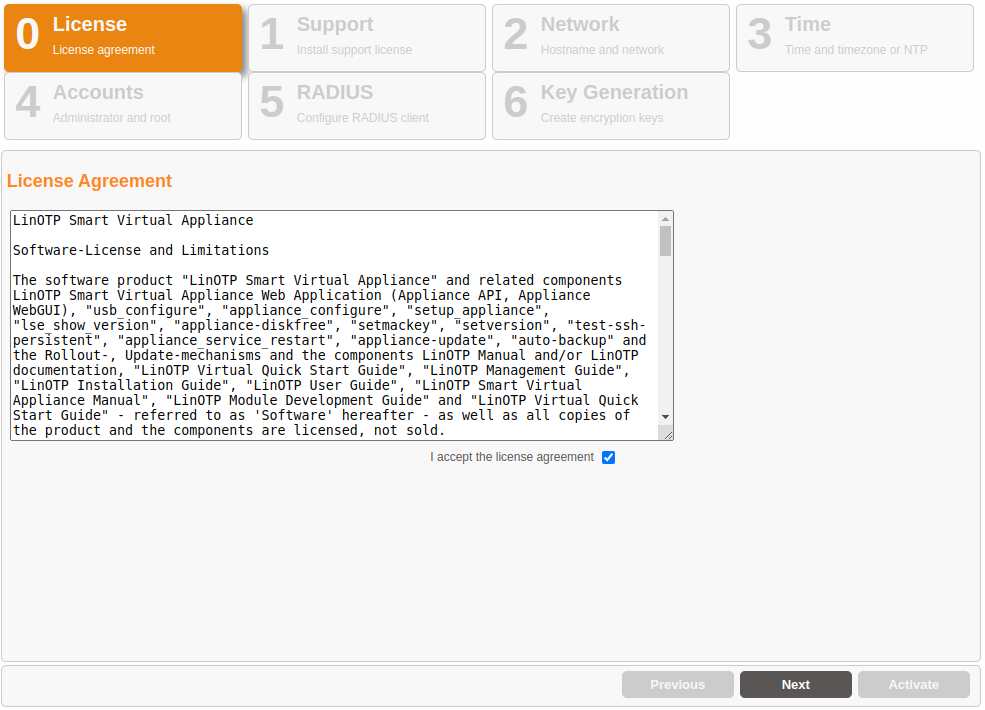
2.3.1. License Agreement
Please read the license agreement carefully. To advance to the next step, check the box following “I accept the license agreement” and click on “Next”. By doing so, you declare your acceptance of the license agreement.
2.3.2. Registration of your Enterprise Support and Subscription license
By default the LinOTP Smart Virtual Appliance offers the ability to run on a demo license which is restricted for 14 days and to maximum 5 tokens.
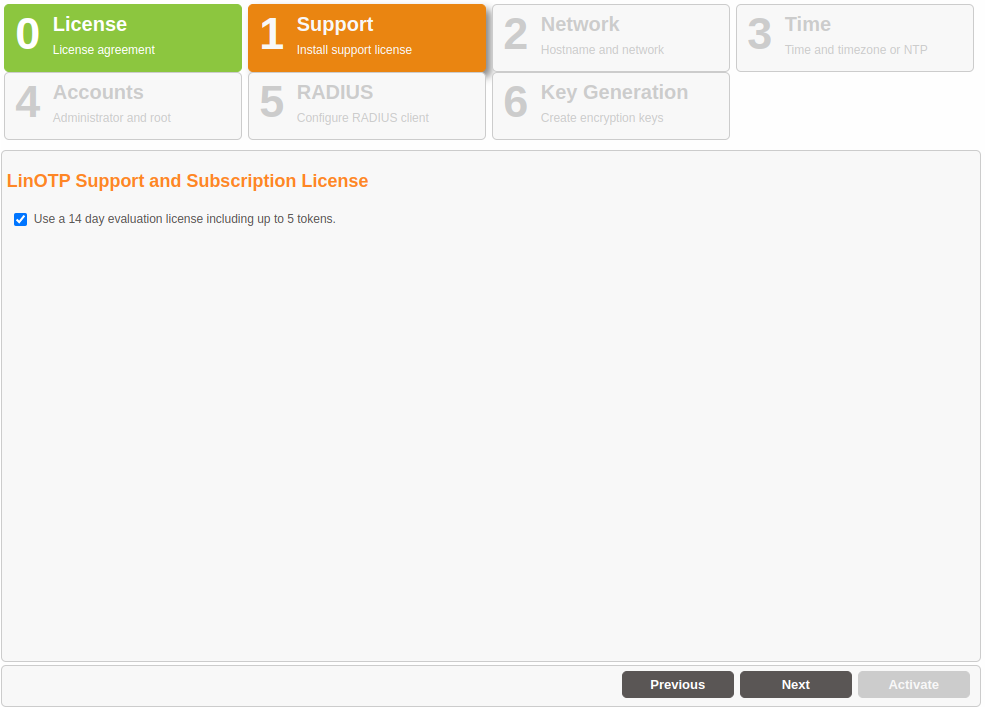
To run the LinOTP Smart Virtual Appliance in a production mode uncheck the evaluation checkbox and enter your LinOTP Enterprise Token license and your LinOTP Enterprise Subscription and Support update key.
Your LinOTP Enterprise Token license is the license file ( *.pem file format), which you received with the purchase of your LinOTP Enterprise Subscription and Support. Activate the license by using “Set License”.
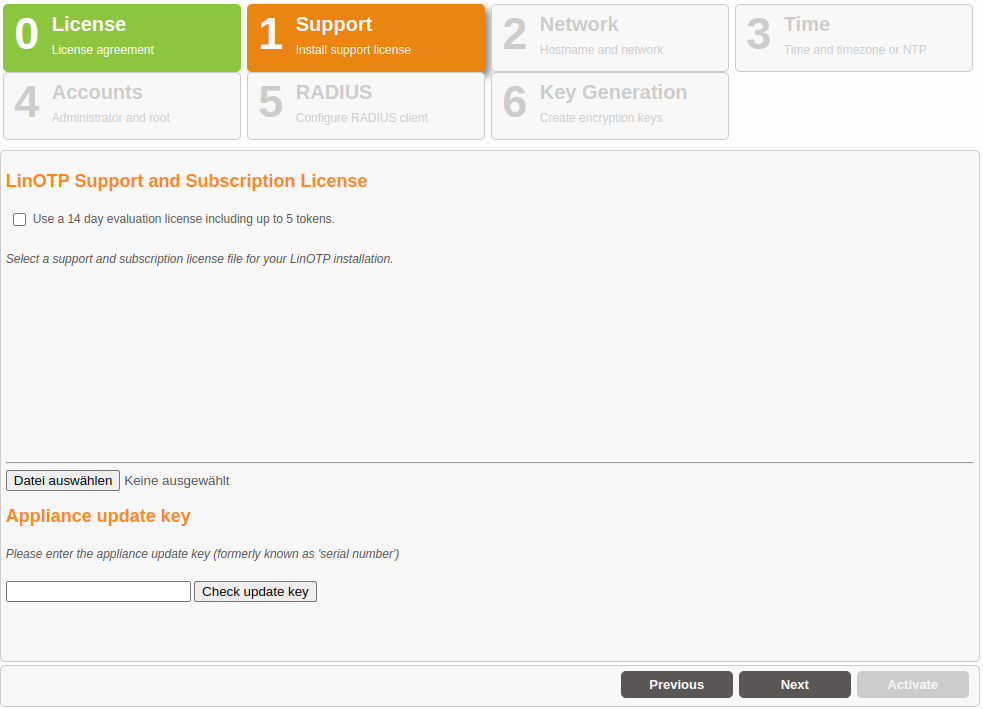
The LinOTP Enterprise Subscription update key is a 8 digit number received as well with your purchase. It is use to keep your system up to date.
2.3.3. Basic Network Configuration
Network Interface
Enter the IP address and netmask via which the LinOTP Appliance should be accessed here. Enter the default gateway under gateway.
Hostname and DNS
Enter the hostname of the LinOTP server here. You can freely select this hostname, however, it should not already be used by another device in the network. Please enter the name of the domain in which the LinOTP Appliance is located separately in the next field. A list of domains can be entered in the “Search” field that will also be searched. Normally, you will enter the domain names there again.
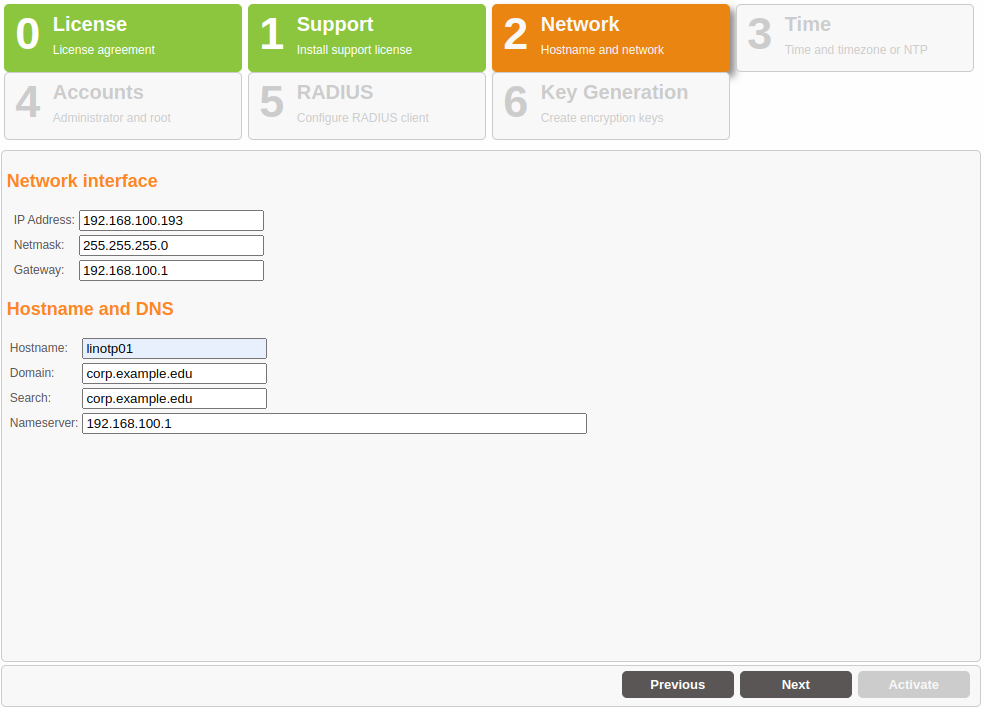
The field ‘Nameserver:’ understands the following syntax:
192.168.0.1, 172.168.0.1
a comma (no comma at the end) separates the lines ‘nameserver…’ in /etc/resolv.conf.
2.3.4. Setting the Time and Date
In a third step, you can change the date, time or time zone, if necessary. An NTP server can be entered from which the time is automatically received, if applicable.
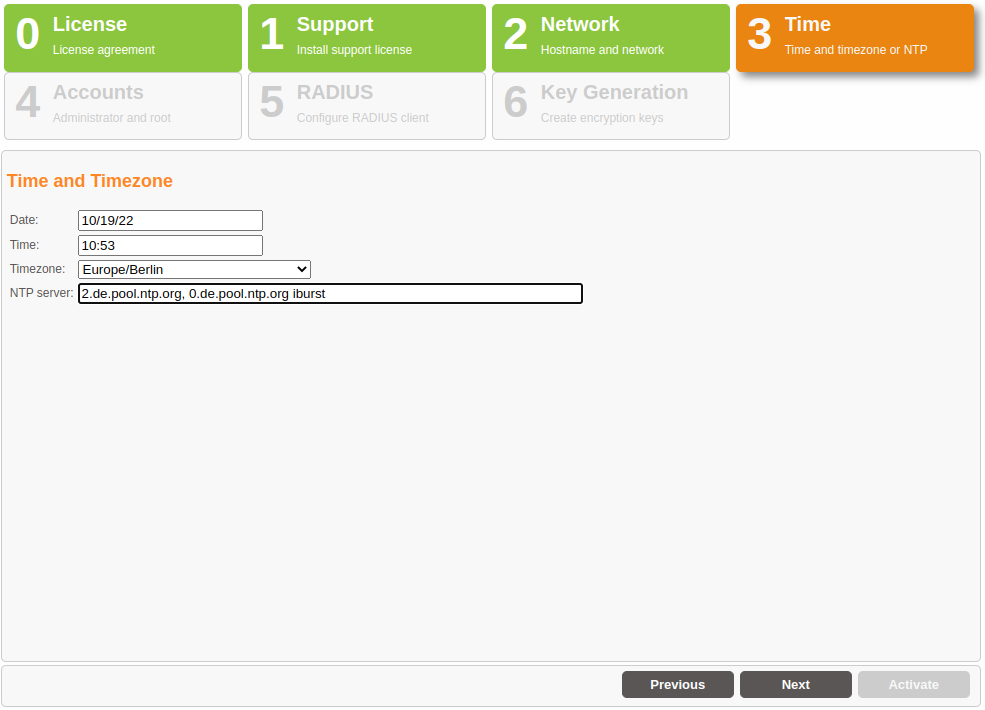
The field ‘NTP server:’ understands the following syntax:
en.pool.ntp.org iburst, 0.debian.pool.ntp.org, 192.168.0.1
a comma (no comma at the end) separates the lines ‘server…’ in /etc/ntp.conf.
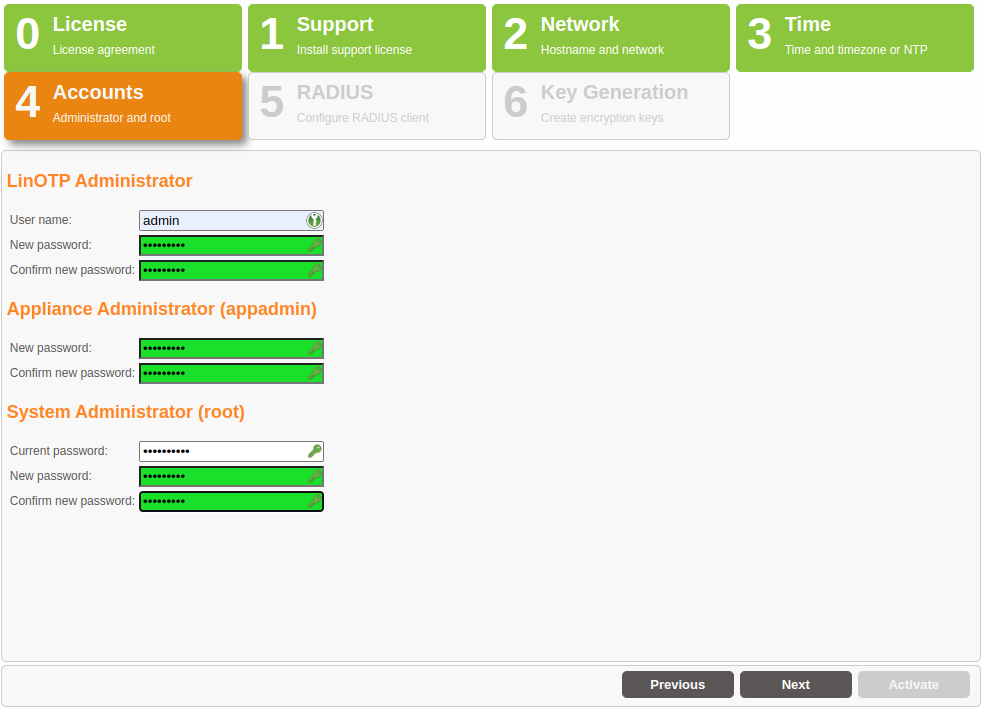
2.3.5. User Roles and Passwords
The LinOTP Appliance generally recognizes three different roles:
LinOTP Administrator – the LinOTP Administrator manages LinOTP. She does not have any rights on the level of the Appliance, operating system or on the network level. The name can be chosen and additional administrators can be configured later in the running system.
Appliance Administrator – the Appliance Admin may only change the Appliance functions and provide access rights. They may change passwords, but not the root password.
Root Administrator – the Root Admin has the most rights on the Smart Virtual Appliance. He has no access to LinOTP, but can manage everything on the Appliance.

Now provide and/or change the passwords for these three roles. The “Old root password” requested for the Root Admin role is the initial root password “eBai6Lait9”.
Note
Note regarding password complexity
For security reasons, be certain to select sufficiently complex passwords when changing the passwords. Passwords are deemed to be sufficiently complex by today’s standards when they meet the following criteria:
Password length of at least 10 characters
Combination of upper case and lower case letters, number and special characters Once you have entered and/or changed all of the passwords, go ahead to the next step by clicking the “Next” button.
Please note that the input mask depicted can only be exited when all fields have been completed and the newly entered passwords are highlighted. Scrolling backwards using the “Previous” button is also not possible until the fields have been fully completed.
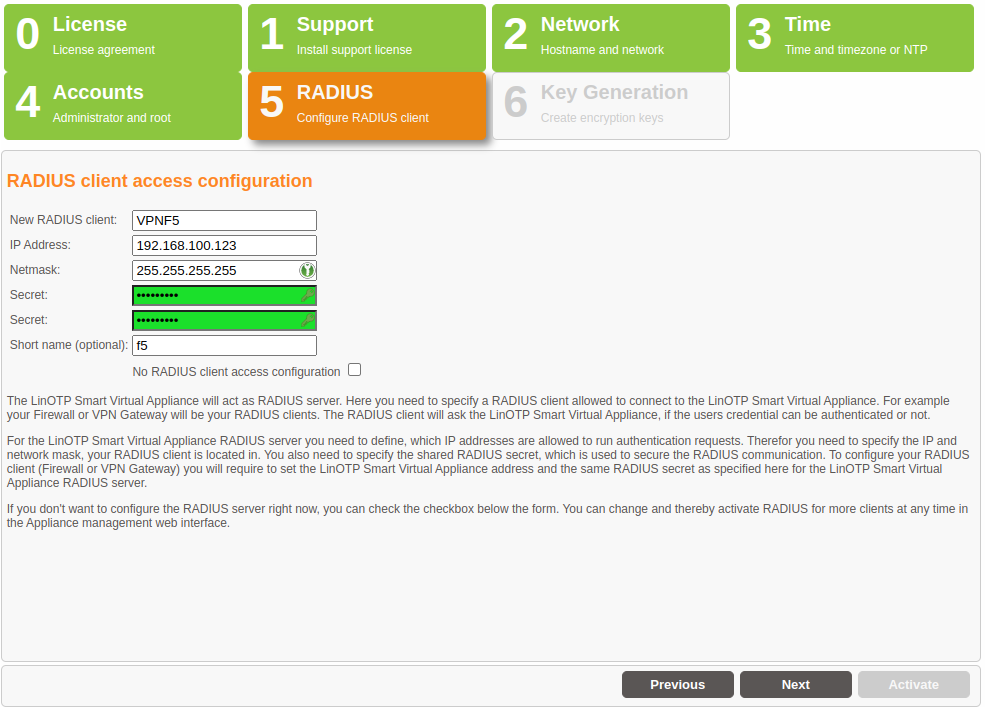
2.3.6. Definition of the RADIUS Clients
In this step, you will define the first RADIUS client to be allowed to issue authentication queries to the RADIUS server of the LinOTP Appliance. Additional clients can be added and managed via the LinOTP Management after the completion of the initial configuration.
RADIUS (Remote Authentication Dial In User Service) is the most frequently used client server protocol for the authentication, authorization and administration of users of dial in connections in a computer network. One generally distinguishes between the RADIUS server, which conducts the validation of the login query, and the RADIUS client, which sends the authentication query. Typical examples of a RADIUS client are a VPN gateway, a firewall as well as a portal server or terminal server.
LinOTP naturally also functions with the LinOTP RADIUS client “LinOTP Authentication Provider for Windows (LAP)” which allows you to make a RADIUS-based login to the Windows operating system or Windows Terminal Server. In order to be able to use RADIUS, enter the subnetwork of the RADIUS client (“Netmask”) and its IP address. You can freely select the name of the “New RADIUS Client”. In addition, the password (“Secret”) is required for the RADIUS communication. If you do not plan to us RADIUS authentication or want to configure it later, you can check “No RADIUS Client access configuration” and skip the configuration.
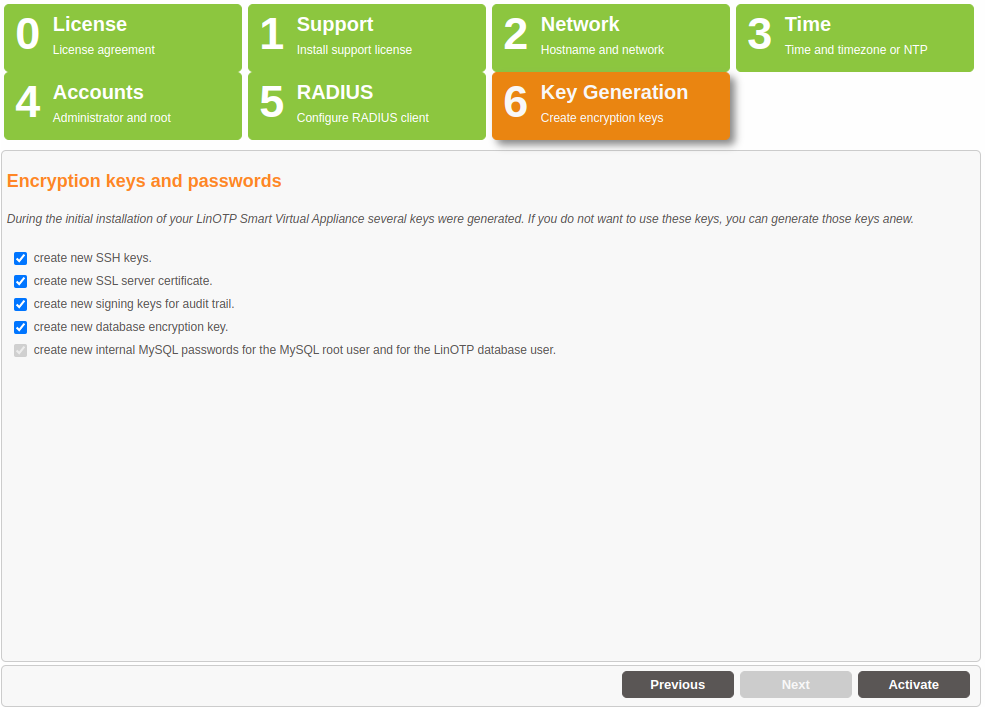
2.3.7. Key Generation and Database Passwords
In the last step, you decide whether the factory installed keys for SSH, SSL and to encrypt the files in the database and the internal database passwords should be generated again. This is absolutely recommended when running the wizard for the first time in order to prevent unauthorized third parties with knowledge of the factory installed keys and passwords from accessing the system or the files.
In addition, you can specify in this mask whether the Appliance should be shut down after the completion of the configuration. You should definitely use this option if you have changed the IP address of the Appliance or want to move it into another VLAN. In this case, the Appliance will only be accessible via the new IP address after the activation of the configuration and can no longer be administrated and/or turned off via the existing browser session.
Click the “Activate” button to save all entries, activate and – if selected – shutdown the Appliance. All further configurations can be made from any computer within the network.

2.4. Part 2: Importing License Files, Connecting to the User Directory, Rollout of Tokens
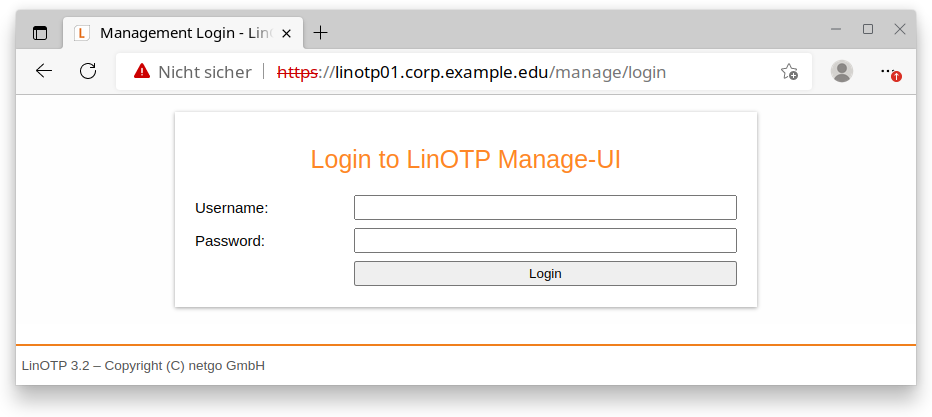
2.4.1. Open the LinOTP Management Interface
Open the browser on your administration computer and enter the IP address of your LinOTP server in the address line as you did previously when performing the network basic configuration https://[IP address of your LinOTP]/manage You may receive the certificate warning already mentioned at this point, deal with this as described on p. 10. Then log in with the access data of the previously defined LinOTP Administrator (the name can be freely issued before).
2.4.2. Creating User ID Resolvers
User ID Resolvers are required in order to make a connection from LinOTP to user directories. These can be LDAP based directory services (Microsoft Active Directory, Novell eDirectory, Open LDAP, amongst others), SQL-based databases or flat files such as /etc/passwd.
A User ID Resolver represents the connection to the respective directory service or respective database. LinOTP only requires read permissions for its access to the target systems.
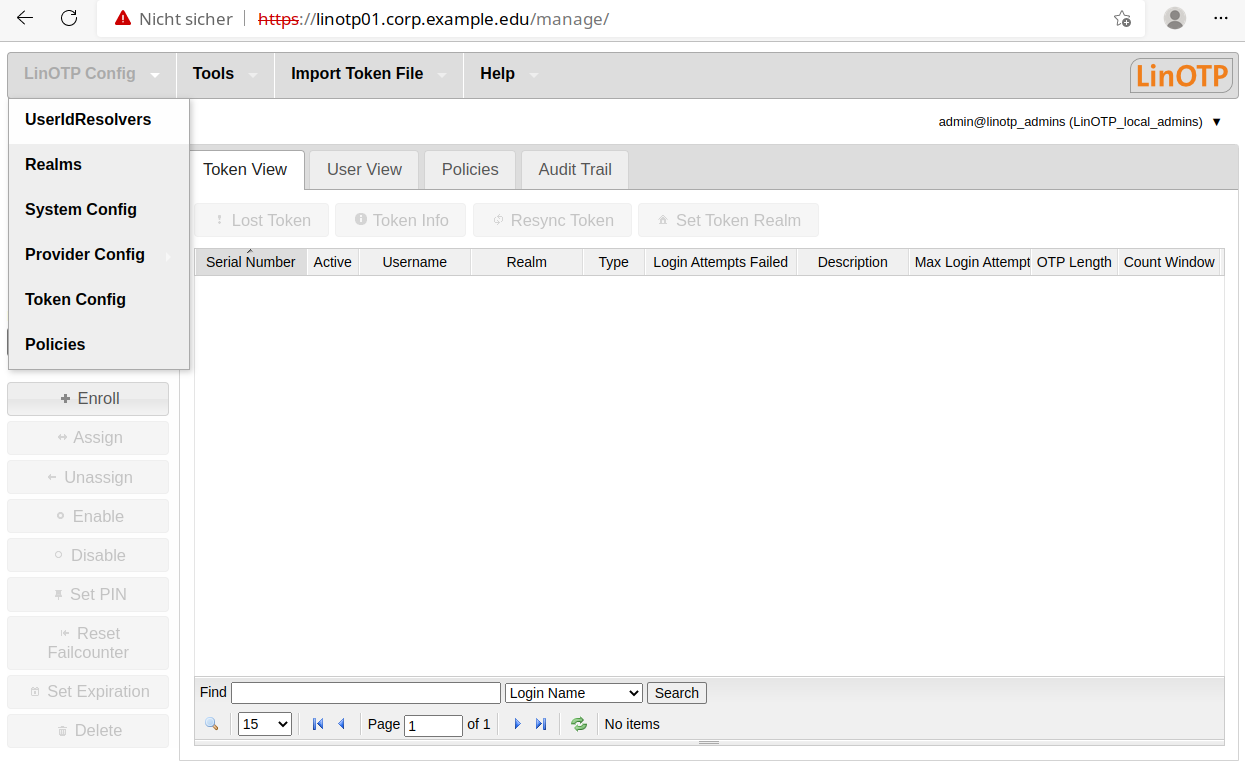
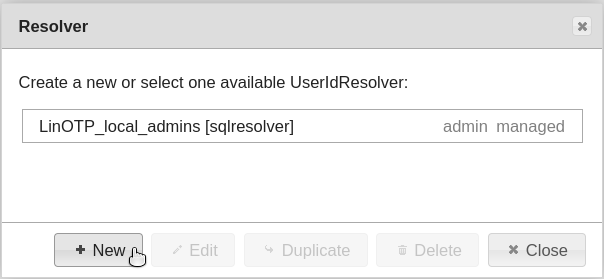
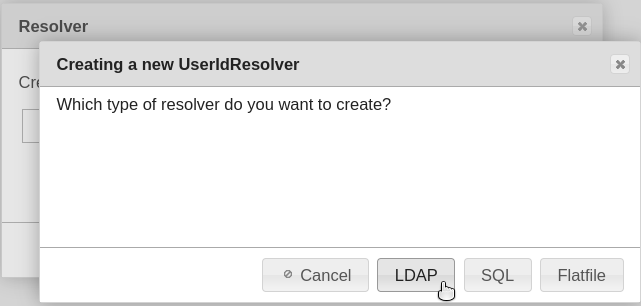
In the start screen, select the item “useridresolvers” in the “LinOTP Config” menu. In the window that opens, click on the option “New” and select the correct directory type (we will choose LDAP for the following example).

Enter the following information in the input mask:
Resolver name (freely selectable)
Server URL (the URL address through which the directory service or database is accessible), this can be either
ldap://ad1.example.net,
ldap://ad2.example.net
for LDAP (LinOTP will try to establish a secure connection via StartTLS) orldaps://ad1.example.net, ldaps://ad2.example.netfor LDAPS - a certificate is required for the latter method.BaseDN (Base Distinguished Name), consisting of the domain components. The BaseDN determines the point at which the directory tree of the User ID Resolver begins to search for users. Please separate the domain components into multiple entries, for example, “linotp.local” becomes “dc=linotp,dc=local”.
BindDN (Bind Distinguished Name, also account, account name), what is meant here is the user account with which the access to the directory service is made (only read permissions are required). The form of the ntries that you have to use depends on the underlying LDAP and/or Microsoft Active Directory® (AD) structure.
For example, the LDAP directory “administrator@dir.linotp.de” would become “cn=administrator,cn=user,dc=dir,dc=linotp,dc=de”. The information “cn=user” is required because the “User” is located in the AD directory in our example. This is not always the case. Another, frequently encountered version that refers to organizational units can appear as follows: “cn=test.user,ou=users,ou=linotp, dc=linotp,dc=de”. Alternatively, the entry “user@domain” can also always be used with AD directories.
Bind Password (the password assigned to the BindDN).
With AD structures, please also check the box “No anonymous referral chasing” (you can find more information in the LinOTP Manual, chapter I, article 3.2).
By clicking the button “Test LDAP connection”, it can be verified whether the user directory can be accessed with the information provided.
Click the “Preset AD” or “Preset LDAP” button in accordance with the selected user directory type. LinOTP will then automatically fill the fields in the lower third of the screen.
Close the process with “Save”.
A window will appear that shows the resolver you have created (name and type). You can now connect to additional user directories (“New”), editing existing resolvers (“Edit”) or delete them (“Delete”). To do so, the listed resolvers must be marked (highlighted). Then close this window with “Close”.
Note
Detailed information about UserIdResolver configuration can be found at Configuring UserIdResolvers.
2.4.3. Creating Realms
A realm must be created after connecting to the user directory. Realms consist of a number of users that can come from different user directories. They offer extensive options for the grouping of users, which could allow them to be distinguished on the basis of their function or departmental affiliation. Multi-client infrastructures can also be easily depicted with realms.
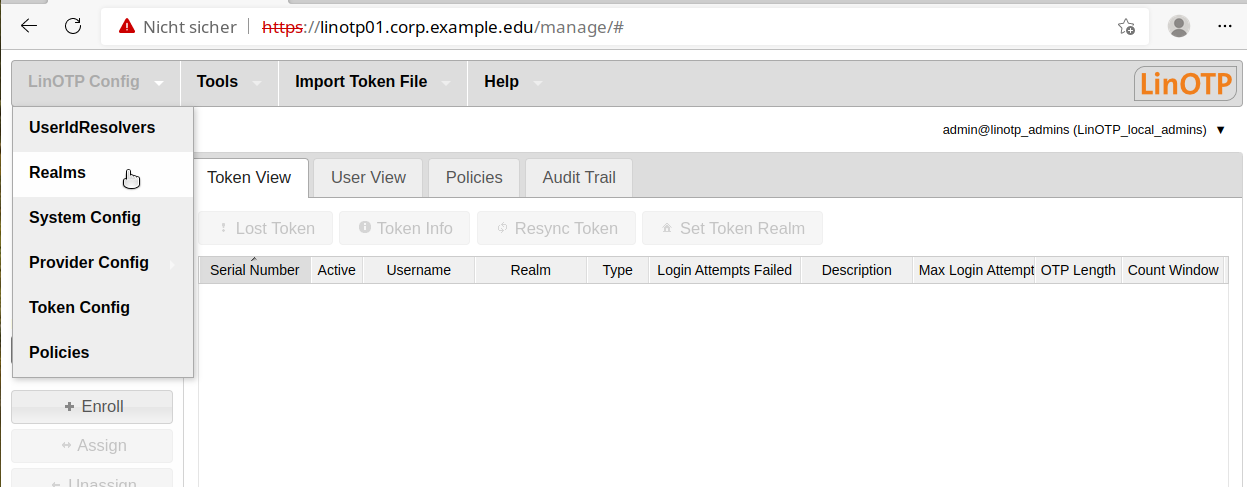
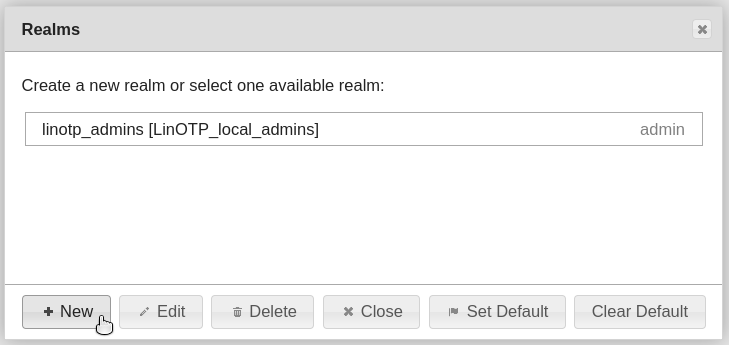
To do so, select the corresponding menu item, “Realms”, in the “LinOTP Config” menu and click on “New” in the window that opens.
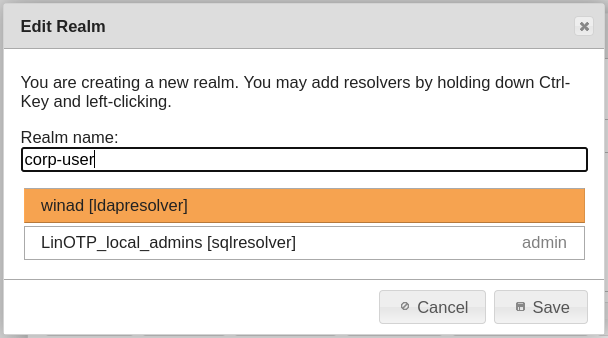
First of all, enter a name and then select the User ID Resolver of a connected user directory (the selection will be highlighted). You can select multiple User ID Resolver to join them together in one realm.
Save the configuation:
Close the “Realms” dialog:
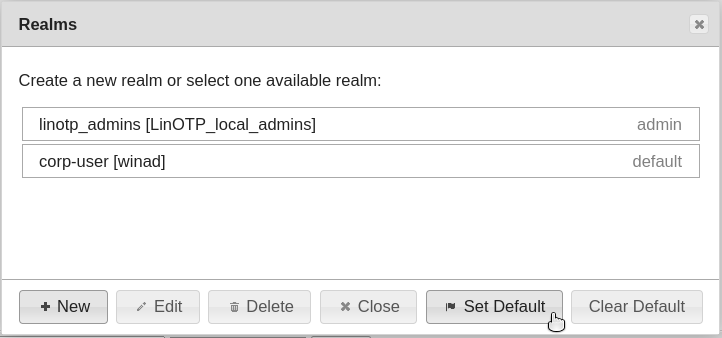
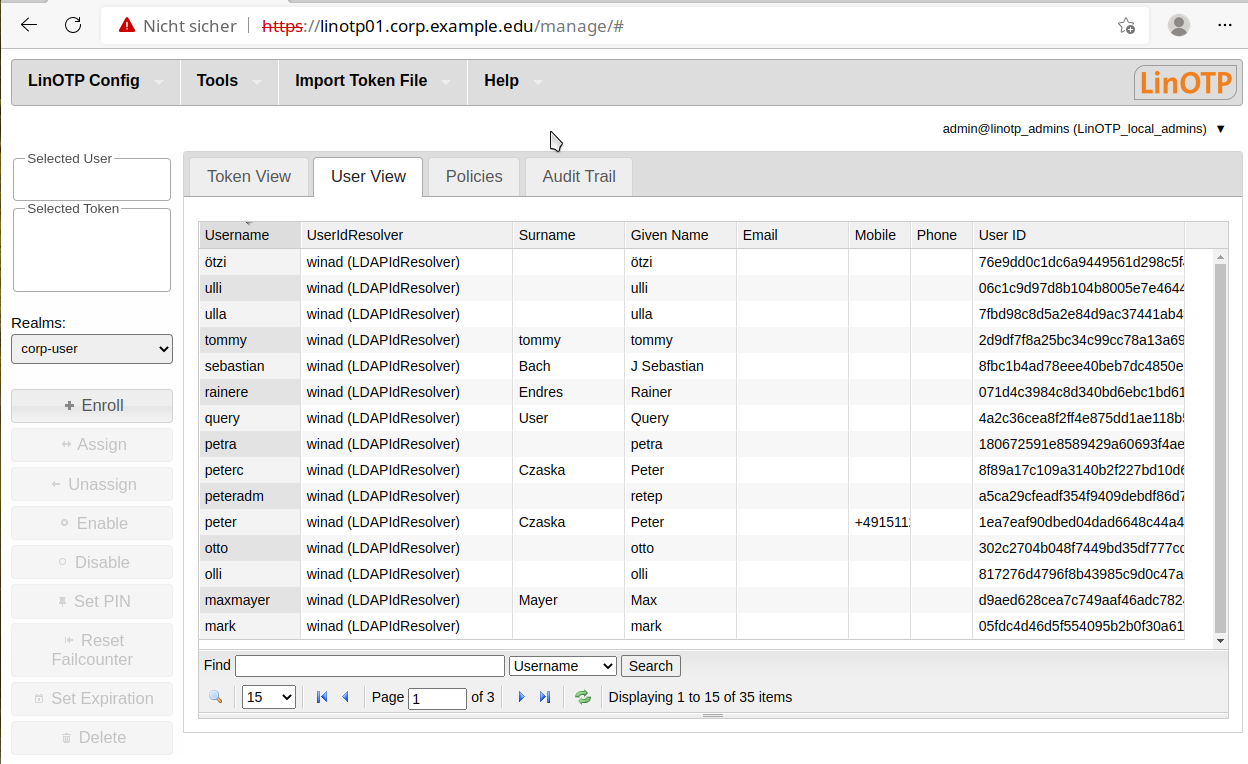
Now the users from the selected realm are displayed in the “User View” tab.
2.4.4. Token
You will also find extensive information about this topic in the LinOTP Manual (Chapter I “LinOTP Management Guide”, Section 6 “Managing Tokens”).
2.4.4.1. Hardware Token
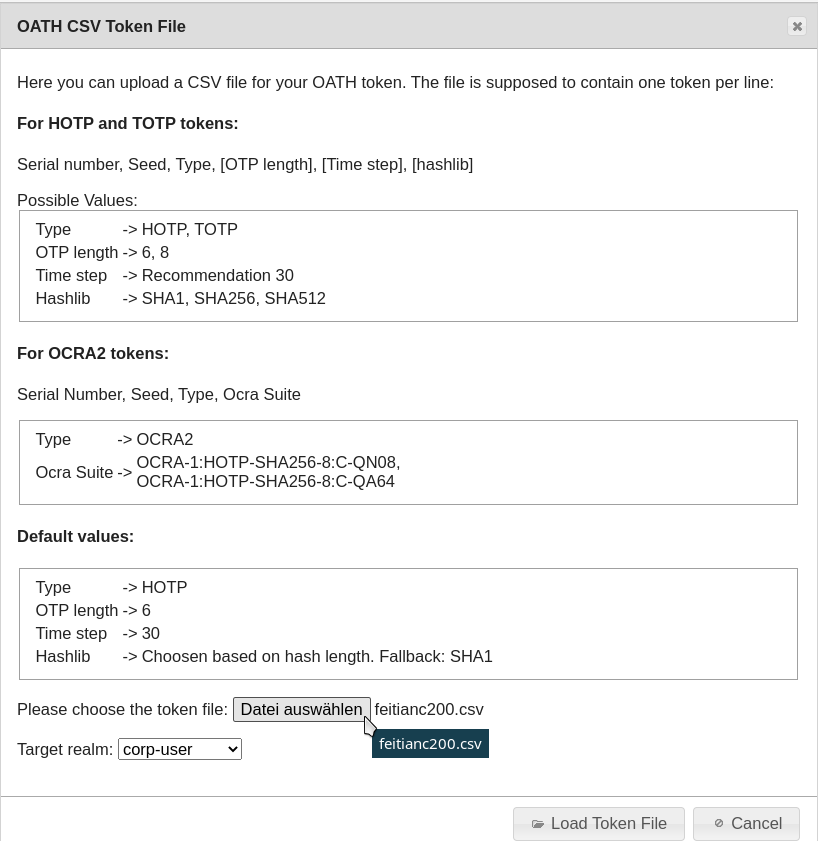
In order to use the tokens, first import the file with the token seed files (import record). A seed file represents the secret key a token needs to generate the OTP value. To do so, select the item “Import Token File” from the menu and then the file type (“SafeNet/Aladdin XML” in our example).
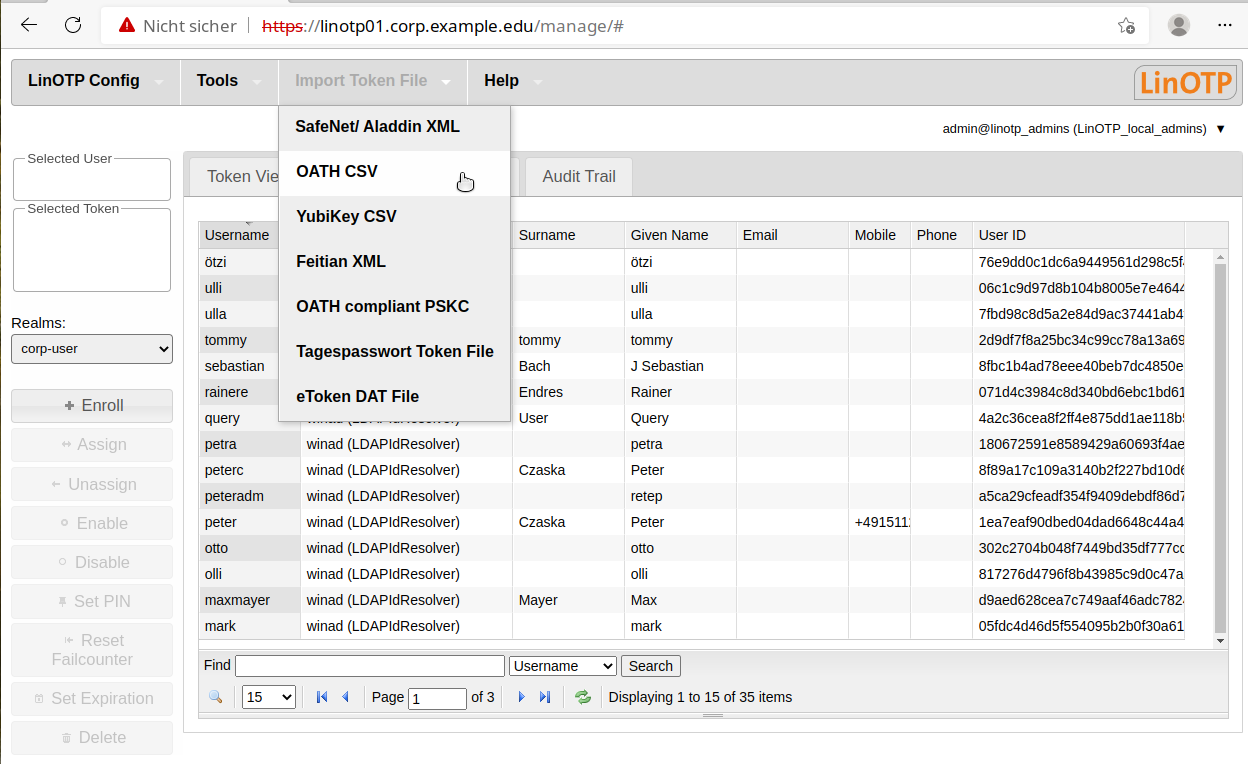
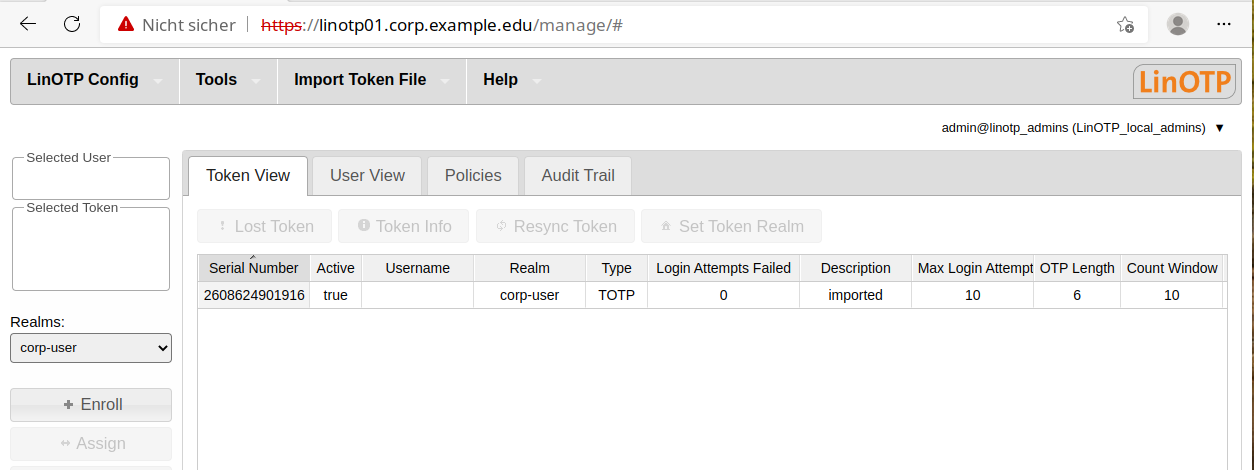
First find the file with the token serial numbers and accompanying seed fi les that you received from your dealer. Now click the “Load Token File” button to load the token seed file/import record. The tokens loaded are now displayed in the “Token View”.
2.4.4.2. Soft Token
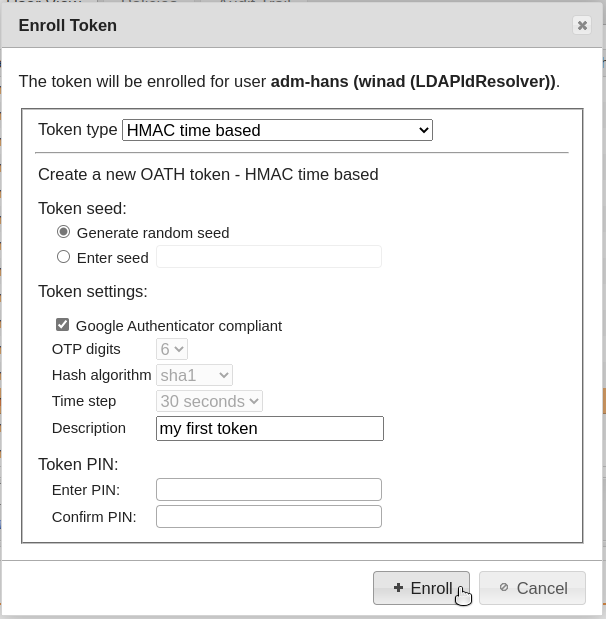
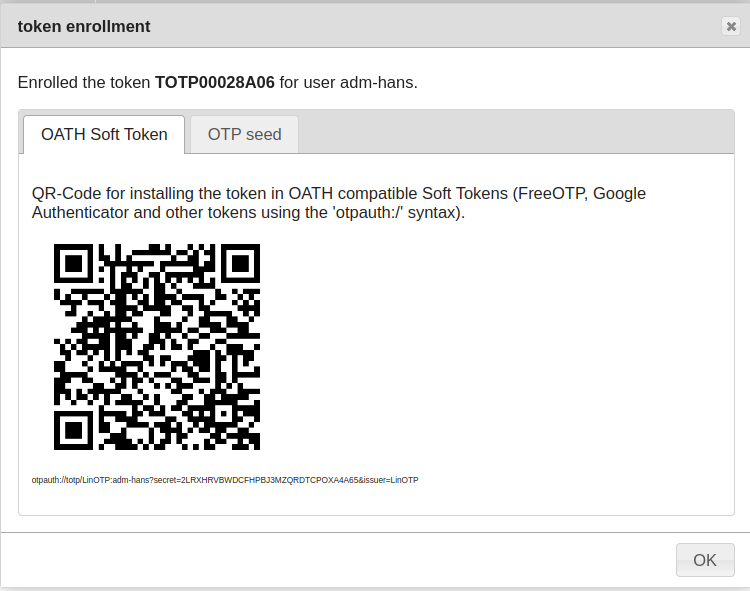
In order to enroll an initial software token, switch to “Token View”.
Click on “Enroll” and select “HMAC event based” and “Generate HMAC key” to generate a new seed. The QR code generated can be read by various software tokens (Google Authenticator or FreeOTP, for example).
2.4.5. Assigning Tokens
Now assign the newly loaded tokens to your users. To do so, search for the corresponding user in “User View” and mark them (the entry will be highlighted ).
Switch to “Token View” and select the token that should be assigned to the user (the entry will be highlighted).
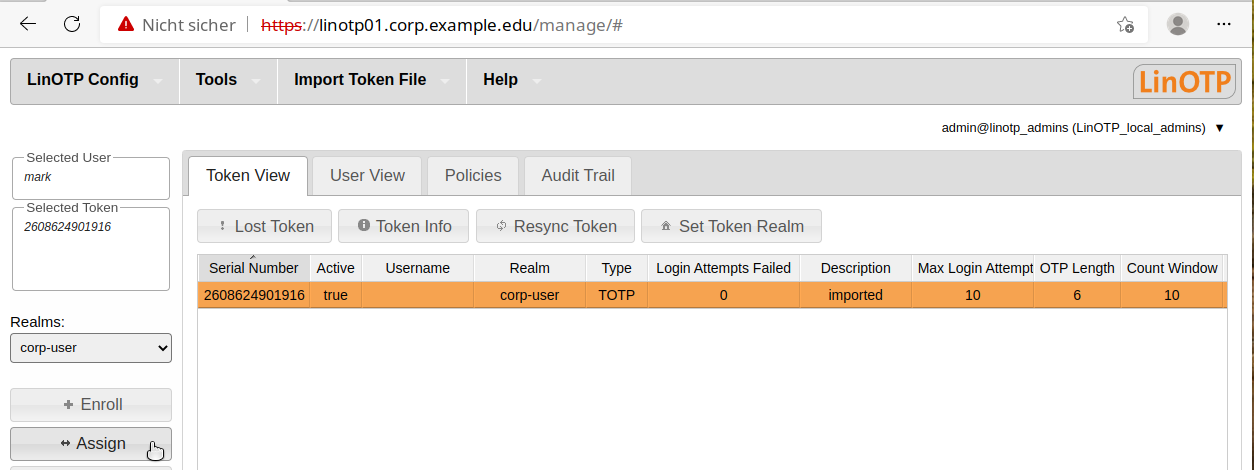
Then click “assign” in the menu to the left to assign the token. If you switch back to “Token View” after this process, the name of the user will be displayed in the corresponding column behind the assigned token.
2.4.6. Setting the Token PIN
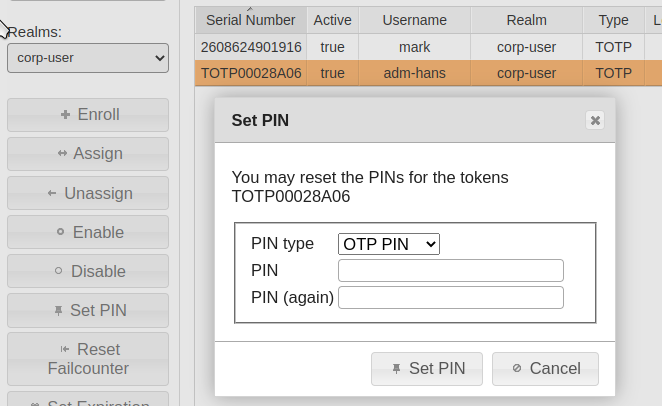
Certain scenarios require a higher level of security in handling tokens. The underlying principle is strong or two-factor authentication. It is more secure than simple typing in a password or showing a card, as a user must prove both factors of possession (token) and knowledge (password or PIN) to receive access.
To do so, set a PIN for your token.
First select the desired token (the entry will be highlighted).
Click on the “SET PIN” button in the left-hand side menu. A dialog window will appear where you can set the PIN yourself.
Your LinOTP Appliance is now fully configured and the tokens have been rolled out and assigned. You can being using your Appliance!
Please make sure to correspondingly configure your RADIUS clients before the first use. We have compiled a practical test as well as some useful information and tips for you on the following two pages. Please read these carefully in order to avoid any later complications.
We wish you a great deal of success for the use of your LinOTP product!
2.4.7. Practical Test
Before you place the LinOTP Appliance in live operation, you have the opportunity to test whether all of the configuration steps have been successfully completed using one of the rolled out tokens.
Select the token of a user whose user name you know.
Type https://[IP address of your LinOTP]/auth/index into the address line of your browser.
Enter the user name for the selected token in the login screen.
Generate an OTP value with the selected token and enter it along with the OTP PIN.
LinOTP will report a successful authentication process to you.
If the authentication fails, please check the configuration of your LinOTP Appliance, especially User ID Resolvers and tokens. The audit trail log in LinOTP Management can provide you with useful details for this. Also make sure that you have selected the proper token and that you have not made any typing errors. If you continue to be unable to make a valid authentication, please contact your LinOTP dealer.
2.4.8. Use Information and Notes
2.4.8.1. Backup and Software Update
Backup: We strongly recommend backing up the LinOTP configuration as well as the database at regular intervals. In the event of a defect with the appliance, this is the only way that the rolled out tokens can continue to be used seamlessly and without a new rollout. In Appliance Management, LinOTP offers a func- tion for automating the backup process. Please consult the LinOTP Manual (chapter IV, article 13).
Software Update: Our developers work continuously to improve our products. Take advantage of patches and new features by updating the LinOTP Software and the Appliance at regular intervals. Appliance Management also provides an automated function for this; all you require is a valid software subscription & support license in order to use it. You can find more information about this in the LinOTP Manual (chapter IV, article 12).
2.4.8.2. Important URLs and Administrator Roles
The following table provides an overview of the most important URLs as well as the admin roles.
2.4.8.3. HA Mode
Additional, in part varying, configuration steps are necessary for use in HA mode. You will find an introduction for this in the LinOTP Manual (chapter IV, article 10).
2.5. Appendix: Practical Tips and Legal Notes
2.5.1. License Conditions
The software of the Virtual Appliance, Hardware Appliance and LinOTP are protected by copyright. You can find the complete license conditions at LinOTP Smart Virtual Appliance License. In addition, they are displayed upon the first use of the Appliance as the first step of the configuration wizard.
We would like to expressly thank the members of the Debian project here.
2.5.2. Support Addresses
In the event of support questions or hardware defects, please contact us. If you would like information regarding our standard support offers, hardware replacement service as well as the additional support options which incur charges, please contact or inform yourself of our support offer at: https://linotp.de/support.html
Alternatively, you can reach us at +49 6151 86086-277 or via email to support@linotp.de
2.5.3. About netgo LinOTP
netgo GmbH - LinOTP is the leading vendor of secure connection technologies centered around vendor independent logon security and identity management.
netgo LinOTP belongs to the netgo group GmbH.
Hausanschrift:
Unternehmensdaten:
Office address:
Corporate data:
Contact: